Thursday, December 5, 2013

HOW TO ERECT A 27' TALL CHRISTMAS TREE IN LESS THAN 3 DAYS


When you first read the title of this blog post, you were probably shocked that this feat is humanly possible. Well it is, and all it requires is 5 or 6 worthy helpers, a forklift, a scissor lift, 50' of rope, 200' of 1/8" cable, some cable clamps, 1 retro-fitted tree stand, a whole lot of gawkers, and some blood, sweat and tears. Oh, and I should add, it requires a large room with at least a 28' tall ceiling. Below are your step by step instructions. Enjoy!
 
 
1. Fasten the rope somewhere on the top portion of the tree and pull from an elevated platform. You should have someone, or better yet, a 500 pound stationary object hold the base of the tree from sliding. You will need 2 or 3 of your helpers to submerge themselves in the branches of the tree and push toward the puller. Warning: Your hands, hair, and any other exposed body parts will be sticky after this step.   
 
2. Continue pulling, even if the guys pushing from the bottom are adding additional weight because they didn't understand they were supposed to push, not climb.
 
3. Make sure there are many spectators available. Even though you may want them to leave the premises until the tree is up, they mean well offering their support. Who knows, with all those spectators excercising their photography and video taking skills, you may end up being a popular entity on one of those fun loving social websites I have such a high regard for.  


4. When you have it about half way up and everyone is sweating and grunting and it looks like you may have to throw in the towel..............drop the tree. Take a moment to re-evaluate the situation. This may take a couple hours, but just make sure Plan B is better than Plan A. 
 
 
 5. After you re-group and decide it's going to take some equipment to raise the tree and a few modifications to the tree stand, you should be ready to go. Another tool you may find handy that I failed to mention above is a level or a good set of eyes. However, if you use a level, don't place it on the end of the branches. You can see the results of this leveling application in the photo above.


 6. This is what your tree should look like if someone with a good set of eyes levels it. At this point, the cables are fastened from the upper portion of the tree to various parts of the building. You'll want to fasten the cables high enough to avoid clothes lining anyone walking through the lobby.

 7. And here is the finish product complete with decorations and a train. Thank you to everyone who participated in the production of this instructional - especially the sappy guys. I mean the guys who are still trying to wash the sap off.

The word floating around the office is that we're going for a 30' + tree next year. We might as well take advantage of all that ceiling space. 


Monday, December 2, 2013

Goodland 2 Million Gallon Tank

In Goodland, KS we have just finished our first 2 million gallon storage tank. As a company we often recognize the sales and shipping milestones, so I'm taking this opportunity to recognize this monumental milestone for the company. Congratulations AgroLiquid on the completion of your first 2 million gallon tank. Now it's time to fill it and more importantly empty it time and time again. Just to give you an idea of how large a 2 million gallon tank really is, it can hold 2 million 1 gallon jugs of milk or.......2 - 1 million gallon jugs of milk. I'm surprised I don't get recruited to work in a lab or something.
 
Litweiller Sand Blasting & Painting is the company who applied the interior coating and who will paint the exterior in the spring. We're waiting on the exterior until the spring to take advantage of more ideal weather conditions. Plus we want to have the interior of our second 2 million gallon tank in Williams completed before we worry about the exteriors.

The gray color on the wall is the finish product. The white color is a primer. The dark portion on the floor is raw steel that has been sand blasted. The reason for the dark finish over the light primer is to make it more visible if the coating begins to chip or peel, in the hopefully distant future. This allows us to address the issue early before it becomes a problem.

If you ever wondered where the lines go once they're on the inside of the tank, here's your answer. These are 4" fittings used for suction, fill, and circulation. The circulation line is on the left. It will eventually have a 4" pipe fastened to it that extends across the tank. This pipe has (10) 1.5" nozzles tapped into it that help circulate the product. The suction line is in the center. This extends down into the sump which aids with draining the tank completely. The fill line on the far right is for........ you guessed it.....filling the tank.


Believe it or not, this scaffolding breaks down small enough to hand it through a 30" diameter manway. That could quite possibly be the worst part of this job.
 
Nope. I changed my mind. This would be the worst part. Not that sandblasting would be terrible, but sandblasting this much surface would take a little time........and be terrible.
 
Here's the tank walls post-sand blasted, pre-primed. This perspective gives you a good feel for how large the tank is. Just think, maybe someday if the fertilizer thing doesn't work out, we can host basketball games or roller derbies.

I'm not sure what's going on here but to give you another idea of how large this tank really is, the guys in the photo are grown men, not dolls.

Now I feel like I've really accomplished something. 2 blog posts in 1 day. I'm exhausted.


Williams Tank Relocation Part II

You'll have to forgive me. I'm not the habitual blogger I should be like that guy doing the AgroLiquid NCRS blog. This is one of the items that tends to hang towards the bottom on my list of priorities. Anyway, here is the latest and greatest in Williams. We're a little closer to having the remaining tanks moved to the new containment.
 
We didn't work late, we started early. As always, the wind wasn't agreeable so we were delayed a bit. We ended up starting early the next morning while the wind subsided for a couple hours but it didn't take long for it to pick back up. By around 9am, we were back to the "normal" 20-30 mph winds. I would definitely own a kite shop if I lived in Iowa.......or Kansas.

 You can't see it under the insulated tarp, but the last of the concrete was poured at this time as well.

This is the east end of the new containment with a few of the 12 tanks moved this time around.

The new/used scale is now complete with a scale house. This will be used to verify load weights before trucks leave the site. The scale was purchased from an excavation company in Michigan. It was dismantled, shipped on a flat bed and re-installed with success.

Of course before we left, we got to experience some minor snow mixed with yes.....more wind. We have a lot of work to do before the spring rush next year but who wouldn't want to spend time in Iowa during the winter months. 


Monday, October 21, 2013

Trying to beat Mother Nature

 
As the end of the year rapidly approaches, it's always hard to tell what kind of weather Mother Nature will throw our way from now until then. I'm optimistic that we'll complete the tanks in progress along with some concrete at a few sites that needs to be poured yet. My optimism isn't based on anything like achey joints or the way the trees look. I'm going on good old fashion intuition........or maybe I'm just naive. Here's where we are now.  
 
The 2 million gallon tank in Williams in nearly complete. At the time of this photo, they were working on the roof. Currently, they should be close to wrapping it up.

 Same tank, different angle. The last step off that ladder is a doozy.
 
The pumps are set and the hard pipe plumbing is installed for the Pro-Germinator and High-NRG-N. Testing and troubleshooting have been underway for the new truck load out system. The remaining tanks will be moved toward the end of this year.......weather permitting.

It looks a little crowded because it's being used as a warehouse also, but the truck load out building is complete. A closer look toward the elevated office will reveal the new load arms.

In Ashley, the second 500,000 gallon tank is almost finished. They are working on the roof at this time with the fittings, railings, and manways soon to follow.

Billings Tank Swap


I'm a little late with this, but better late than never. Two weeks ago in Billings we increased our storage capacity by swapping out (4) 21,000 gallon tanks for 30,000 gallon tanks. As you can see from the photos below tanks coming and tanks going. I always enjoy Billings during my short stays. Maybe someday I'll get to vacation in "God's Country", as Mike Kilzer puts it.


Site Manager, John Burkhart and Area Manager, Mike Kilzer were on site to assist with the tank swap. In this photo, I think Mike dropped his wedding ring or something and John helps him look for it.


Here is the site after the tanks have been swapped out. It looks more uniform now with the same size tanks which should appease all the OCD people out there.


Tuesday, September 24, 2013

Williams, IA Tank Move Phase 1

Williams was the hot spot for construction over the last month or so. We've added site lighting, signage, continued construction on a 2 million gallon tank and moved (24) 30,000 gallon tanks to the new containment. All this while continuing to supply customers with fertilizer through a very busy August and September. Hat's off to the guys at the sites for not breaking stride while we disrupt their daily activities with the site improvements.
 
In the last 4 weeks I've made a couple trips to Williams. Trip 1 was for the phase 1 tank move of 24 tanks. Trip 2 was to work on plumbing for those tanks.


As I pulled up to the site on trip one, I couldn't help but notice the new road side sign. Hopefully this will help distinguish our site from the coal company next door. For those who don't recognize the sign, it was re-purposed from the old office in St. Johns. I wonder if they figured that into our LEED points.
 
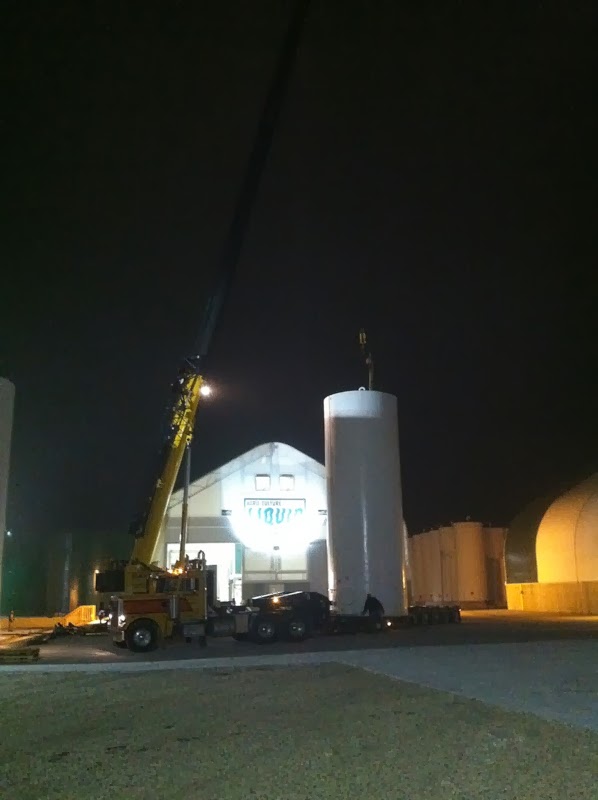
The cranes arrived the day before to get set up. The set up alone takes a couple hours so we didn't want to waste valuable time in the morning doing it. This is the larger of the 2 cranes used. It has a reach of 350'. However, we didn't need quite that much height for a 35' tank. This is set next to the new containment in front of the new load out building.
 
The second crane, which only has a 275' reach but is still adequate for this purpose, set up next to the old containment, which we will be de-comissioned and used for trailer parking in the future. So it was a beautiful morning with a little breeze to kick off the tank move.
 
The cranes have 2 hooks. One would fasten to the lugs on top of the tank while the other was used to raise and lower the rigger (guy on top of the tank). This looked like a pretty cool job. I've seen carnival rides that would work as good training tools for this occupation.
 
After the tank was rigged, the crane operator set the tank vertically on a flat bed. Once secured the truck would transport the load 500 miles to it's destination. Correction....about 500 feet to it's destination.
It was a smooth ride for the tank moving across fairly flat concrete the entire way. However, the wind did pick up a bit adding some difficulty to the task. We ended up shutting the operation down after moving 6 tanks on day 1 because of the wind. Day 1 allowed us to figure out the system making day 2 very efficient. We were able to move the remaining 18 tanks in about 5 hours on day 2.
 
The crane operator has just picked the tank off the trailer and is moving it into position. I was amazed at the accuracy of the operator.
 
He's just about ready to set it down. We set these tanks on 1" foam insulation in the containment to prevent stones or abrasive concrete from rubbing on the tank. You can't see him in the lift on the right but Grounds and Building Supervisor, Ron Andrews, is securing the tanks with cable guy lines down to the containment walls.
 
The rigger is taking a ride back up to unhook the tank. Site Manager, Jeff Luiken is scoping out the location for the next tank. I might add, it was about 100 degrees with 90% humidity while this was going on. 
 
At this point in the operation, the cranes have left, the tanks are set and secure. You can see from the void spot in the containment there will be a phase 2 tank move. There are 32 more tanks to move in this phase (scheduled for November).
 
A birds eye view of the tanks.........
 
........and a moles eye view of the tanks.
 
And here is what's left of the existing containment. We'll re-purpose the fence around the new containment and the peastone in the rings can be re-purposed when we build another large tank out back.

 
This photo may not mean much to most but it's a completely new plumbing method for us. We typically run flexible rubber hose from tank to tank resulting in hundreds of feet of wasted hose. This method uses a rigid common header which all the tanks with common products will feed. The 6 inch header (pipe) pictured here will run to the intake side of the pump resulting in the maximum supply the pump needs to give us the flow rates we want to achieve.

Since I was up in the lift taking pictures I thought I'd face east and get one of the 2 million gallon tank. This photo is about 3 weeks old. Currently, the crew is working on the third ring (24' tall).


This probably looks familiar. We've developed a standard at the sites when it comes to the way our buildings look. This is the new truck load out office in Williams. The building layout is slightly different than Ashley and Stockton because we re-purposed an old office from the plant area in Williams but asthetically we mimicked the colors and design of the other sites.
 
 
Next week I'm back off to Williams to continue work on the plumbing. The full facilities crew will be out there at the same time to complete the phase 1 plumbing set up for loading High-NRG-N and Pro-Germinator with the new truck load out office (pictured above).
 

Friday, August 9, 2013

Colorful Tanks, BIG Tanks, and a Nearly Completed Office

WILLIAMS
The 500,000 gallon tanks in their completed form. Green was chosen for a couple reasons. Number 1: The dark color will attract the sun light in the winter, heating the air space between the inner and outer tank walls, making it easier to store certain products through the winter. Number 2: It's a great representation of our company. Green (environmentally friendly) products used to grow green (color) products.

GOODLAND
Heartland Tank is moving along on the 2 million gallon tank in Goodland. In this photo they are finishing the welds on the fourth ring. This photo was taken a couple weeks ago. At this time the roof is nearly complete and the tank is almost ready to have the interior coating applied.  When the crew is finished here, they will move to Williams to construct another tank of the same size.

 ST. JOHNS - CORPORATE OFFICE
So close to completion. The flags have been raised and the contractors are working on the final touches as the September 14th public open house draws near.

Just last night they painted the parking lot stripes for those of us who have a difficult time gauging the correct parking space size.

And this is looking in the direction of where the old building stood at one time. Now that it's gone the excavation for site drainage and parking lots can be finished.

 This is a view from the Dewitt Road entrance looking at the east side of the IQ Hub.
 
The landscaping is coming along nicely. The lawn has been seeded and the irrigation system is getting installed. In the background you'll notice the storage building.
 
Here you see the west side of the storage building and the current lay down area for equipment, materials, and dumpsters. Eventually, this will be more parking lot.
  
Up ahead is one of the wood bridges that spans over the rock basin on the walk path. This will be used on those days when employees need to get away from their desk for a minute or two.

A view of the back of the building from the walking path.

Wow! I'm beginning to think i-phone photography might be my thing. What a shot from the north looking south east at the front of the building. I'll admit, the beautiful morning helps a little. Next time maybe I'll use a real camera and see what I'm really capable of.