Thursday, December 5, 2013

HOW TO ERECT A 27' TALL CHRISTMAS TREE IN LESS THAN 3 DAYS


When you first read the title of this blog post, you were probably shocked that this feat is humanly possible. Well it is, and all it requires is 5 or 6 worthy helpers, a forklift, a scissor lift, 50' of rope, 200' of 1/8" cable, some cable clamps, 1 retro-fitted tree stand, a whole lot of gawkers, and some blood, sweat and tears. Oh, and I should add, it requires a large room with at least a 28' tall ceiling. Below are your step by step instructions. Enjoy!
 
 
1. Fasten the rope somewhere on the top portion of the tree and pull from an elevated platform. You should have someone, or better yet, a 500 pound stationary object hold the base of the tree from sliding. You will need 2 or 3 of your helpers to submerge themselves in the branches of the tree and push toward the puller. Warning: Your hands, hair, and any other exposed body parts will be sticky after this step.   
 
2. Continue pulling, even if the guys pushing from the bottom are adding additional weight because they didn't understand they were supposed to push, not climb.
 
3. Make sure there are many spectators available. Even though you may want them to leave the premises until the tree is up, they mean well offering their support. Who knows, with all those spectators excercising their photography and video taking skills, you may end up being a popular entity on one of those fun loving social websites I have such a high regard for.  


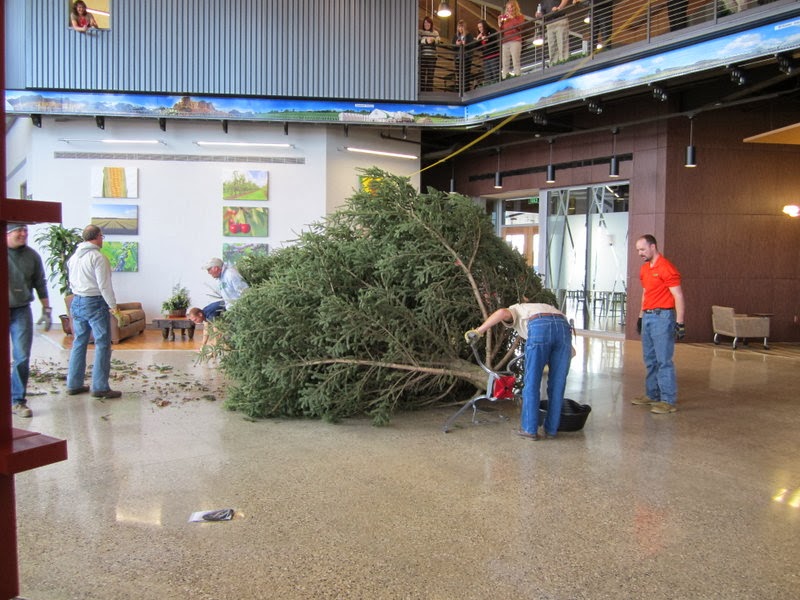
4. When you have it about half way up and everyone is sweating and grunting and it looks like you may have to throw in the towel..............drop the tree. Take a moment to re-evaluate the situation. This may take a couple hours, but just make sure Plan B is better than Plan A. 
 
 
 5. After you re-group and decide it's going to take some equipment to raise the tree and a few modifications to the tree stand, you should be ready to go. Another tool you may find handy that I failed to mention above is a level or a good set of eyes. However, if you use a level, don't place it on the end of the branches. You can see the results of this leveling application in the photo above.


 6. This is what your tree should look like if someone with a good set of eyes levels it. At this point, the cables are fastened from the upper portion of the tree to various parts of the building. You'll want to fasten the cables high enough to avoid clothes lining anyone walking through the lobby.

 7. And here is the finish product complete with decorations and a train. Thank you to everyone who participated in the production of this instructional - especially the sappy guys. I mean the guys who are still trying to wash the sap off.

The word floating around the office is that we're going for a 30' + tree next year. We might as well take advantage of all that ceiling space. 


Monday, December 2, 2013

Goodland 2 Million Gallon Tank

In Goodland, KS we have just finished our first 2 million gallon storage tank. As a company we often recognize the sales and shipping milestones, so I'm taking this opportunity to recognize this monumental milestone for the company. Congratulations AgroLiquid on the completion of your first 2 million gallon tank. Now it's time to fill it and more importantly empty it time and time again. Just to give you an idea of how large a 2 million gallon tank really is, it can hold 2 million 1 gallon jugs of milk or.......2 - 1 million gallon jugs of milk. I'm surprised I don't get recruited to work in a lab or something.
 
Litweiller Sand Blasting & Painting is the company who applied the interior coating and who will paint the exterior in the spring. We're waiting on the exterior until the spring to take advantage of more ideal weather conditions. Plus we want to have the interior of our second 2 million gallon tank in Williams completed before we worry about the exteriors.

The gray color on the wall is the finish product. The white color is a primer. The dark portion on the floor is raw steel that has been sand blasted. The reason for the dark finish over the light primer is to make it more visible if the coating begins to chip or peel, in the hopefully distant future. This allows us to address the issue early before it becomes a problem.

If you ever wondered where the lines go once they're on the inside of the tank, here's your answer. These are 4" fittings used for suction, fill, and circulation. The circulation line is on the left. It will eventually have a 4" pipe fastened to it that extends across the tank. This pipe has (10) 1.5" nozzles tapped into it that help circulate the product. The suction line is in the center. This extends down into the sump which aids with draining the tank completely. The fill line on the far right is for........ you guessed it.....filling the tank.


Believe it or not, this scaffolding breaks down small enough to hand it through a 30" diameter manway. That could quite possibly be the worst part of this job.
 
Nope. I changed my mind. This would be the worst part. Not that sandblasting would be terrible, but sandblasting this much surface would take a little time........and be terrible.
 
Here's the tank walls post-sand blasted, pre-primed. This perspective gives you a good feel for how large the tank is. Just think, maybe someday if the fertilizer thing doesn't work out, we can host basketball games or roller derbies.

I'm not sure what's going on here but to give you another idea of how large this tank really is, the guys in the photo are grown men, not dolls.

Now I feel like I've really accomplished something. 2 blog posts in 1 day. I'm exhausted.


Williams Tank Relocation Part II

You'll have to forgive me. I'm not the habitual blogger I should be like that guy doing the AgroLiquid NCRS blog. This is one of the items that tends to hang towards the bottom on my list of priorities. Anyway, here is the latest and greatest in Williams. We're a little closer to having the remaining tanks moved to the new containment.
 
We didn't work late, we started early. As always, the wind wasn't agreeable so we were delayed a bit. We ended up starting early the next morning while the wind subsided for a couple hours but it didn't take long for it to pick back up. By around 9am, we were back to the "normal" 20-30 mph winds. I would definitely own a kite shop if I lived in Iowa.......or Kansas.

 You can't see it under the insulated tarp, but the last of the concrete was poured at this time as well.

This is the east end of the new containment with a few of the 12 tanks moved this time around.

The new/used scale is now complete with a scale house. This will be used to verify load weights before trucks leave the site. The scale was purchased from an excavation company in Michigan. It was dismantled, shipped on a flat bed and re-installed with success.

Of course before we left, we got to experience some minor snow mixed with yes.....more wind. We have a lot of work to do before the spring rush next year but who wouldn't want to spend time in Iowa during the winter months.